I have to start with a compliment to the Mary Rose Trust and their online shop. Before the Mast arrived in record time and was actually deliver by courier on a Saturday morning. Those of you who do not live on the Emerald Isle may not be aware that we have no postal delivery at the weekend so, when the lovely red and yellow DHL van pulled up and the driver approached with a heavy parcel it could only mean that Life and Death aboard the Mary Rose had landed.
I remember watching the raising of the ship on tv once upon a time and subsequently went to see the wreck when it was first put on display during the conservation process. Needless to remark the book (all two volumes) has been receiving close attention and I decided to celebrate its arrival with a project – a replica of 81A2218. I decided to pick this particular one because of the motif of a shield device, possibly emblazoned with a leaping fish. It reminded me of the leaping salmon on the town crest of Leixlip, where I live.
While I am on the topic of Leixlip and leaping salmon I should mention the significance of the place name. Leixlip is derived from the Old Norse Lax Hlaup which means Salmon Leap. It refers to a now submerged waterfall which once could be seen on the river Liffey just below Leixlip castle. It had the distinction of defining the western extent of the Viking Kingdom of Dublin or Dyflinarskeri. A deal was struck with the local Irish that the Viking inhabitants of Dublin could control as far west as the salmon could swim without leaving the water. Hence the Lax Hlaup. Today, there is a special channel on the dam which now stops any westward progress on the Liffey and led to the submersion of the falls. An ancestor of mine, Andrew Nicholl RHA painted a watercolour of the scene about 1838. Lots of reasons therefore to pick 81A2218.
Construction
The flask construction was straightforward and simple. Two pieces of leather were cut to approximate size, leaving a slight margin for trimming. A careful comparison of the flasks illustrated in BtM shows that one shoulder is slightly lower than the other on each side of the neck of the flask. There also appears to be a series of stitch holes just below the rim. More on that later. Once the outline was measured and scribed the leather was sammed and then the tedious chore of punching a lot of awl holes began. I started with the inner seam. Stitching was done with waxed linen thread and two needles using a saddle stitch. I noticed in Before the Mast, a comment about a substance, possibly wax, still in situ on some bottle threads. This gave me the idea of packing the outside of the stitched seam with beeswax shavings before punching and stitching the second seam. The back of a curved awl was just right for pushing the wax into the seam.
Once the seams were complete, the bottle was soaked again and packed with sand. I then inscribed the design on the back and front of the bottle. The firmly packed sand provided a perfect base for impressing the leather. Once that was completed it was into the oven at 70 degrees for about 5 hours to dry out the leather and leave it hardened. In Tudor times the bottles and flasks would have been hung in a chimney or over a fire for hardening.
I decided to stitch an inner collar in the mouth of the flask. As I mentioned above, this was prompted by the stitch holes illustrated on the original and helped to neaten the appearance of the flask. All that remains now is to add a carrying strap and waterproof the inside and outside surfaces. For the inside I plan to use a mix of beeswax and brewers pitch with just plain beeswax for the outside.

The holes are punched and stitching begun. Allowance is made for one shoulder to be lower than the other.

Knotting each stitch

The first seam is packed with shredded beeswax and pressed into the thread with a curved awl. Hopefully it will melt in further when the flask is being dried in the oven.

Stitching is finished and the flask is packed with sand. I use fine grade garden sand as sold for making up pots for rockery plants. It is fine flowing and packs tightly when damp. It forms a perfect base for scribing onto the leather.

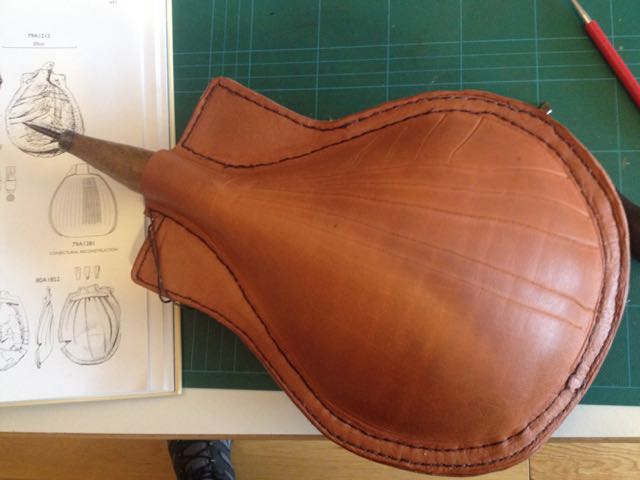
The finished flask removed from the oven. Now for a wooden stopple, waterproofing the inside and outside and a carrying strap.
Nice work! 🙂
I’m planning one of the bottles next – the one with the harp of course.
Fab stuff. But what to put in it for its maiden voyage? Port? Brandy? Rum?
Maybe just some humble ale – given the original was found on the Orlop Deck. I’ll let you know when it is ready for launching – perchance you may like to test it.